Subcutaneous Fluid Administration
Administration of supplemental fluids can benefit cats with a number of different medical conditions. Most commonly, fluid supplementation is recommended for cats with kidney disease. Although the idea of giving fluids may initially be intimidating, we encourage you to consider learning this technique. It is very normal to feel some anxiety about this, but we believe that you will find that it is not nearly as difficult as it would seem. The potential benefit to your cat will make it well worth your time to learn this simple technique. There is an excellent video created by our nursing staff that will guide you through the step-by-step process.
Supplies
The equipment consists of a bag of intravenous (IV) fluids, an IV drip set, and a needle. The IV drip set is a simply a tube that connects the fluid bag to the needle. Although it initially seems complicated, you will soon become very comfortable with the procedure described below.
Connecting the Fluid Line to the IV Bag
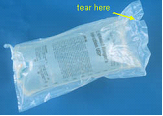
- Remove the outer, protective bag from the inner IV bag.
- Remove the IV set from its packaging.
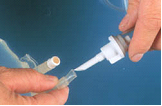
- The top end of the IV set has a large, pointed end with a protective cap. Remove this cap, but do not permit it to become contaminated. IT SHOULD NOT TOUCH ANYTHING.
- Pull the protective covering from the exit port on the bottom end of the IV bag. This will expose a hole that will accept the pointed end of the IV set.
- Push the pointed end of the IV set into the open hole of the IV bag. It must be seated firmly to prevent leaks.
- Remove the protective cap from the lower end of the IV set, but do not discard it. Do not permit it to become contaminated. IT SHOULD NOT TOUCH ANYTHING.
- Close the lock in the middle of the IV tubing by moving the roller. The lock on a new IV set is often already in the open position.
- Gently squeeze and release the bulb at the top of the drip set until the bulb chamber is about half full with fluid.
- Open the lock (roller) on the tubing, then hold or suspend the IV bag; fluid should flow freely.
- Be sure that all air bubbles run out of the tubing.
- Close the lock on the IV line by rolling the roller downward.
- Remove the protective cap on the lower end of the IV set.
- Break the protective covering around the needle so that the open end (not the sharp end) is exposed. Do not permit it to become contaminated by allowing it to touch ANYTHING.
- Remove the protective cap from the lower end of the IV set, and place the open end of the needle on it. Seat it firmly.
Insertion of the Needle
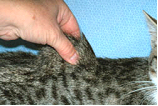
Insert the needle just under the skin in one of several locations that has unusually loose skin. This tends to be an area down the midline between the base of the head to the hips. For most cats the further forward the better it is tolerated.
Fluid Administration
- Choose a location where you will treat your cat. This may be on a table, counter top, or in your lap. Some find that placing the cat in a box with an open top is helpful.
- Hang the IV bag about 3 feet (1 meter) above the level of your cat’s head.
- Place your cat in the treatment location. Be sure both of you are in a position that will be comfortable for about 5-10 minutes. The end of the IV set should easily reach your cat.
- Pick up a roll of loose skin in one of the above locations.
- Lay the point of the needle at the base of the roll of skin with the needle horizontal and pointing to the cat’s head. This assumes that the cat is in an upright or standing position.
- Advance the needle slightly forward while pulling the roll of skin backward. That should place the point of the needle under the skin.
- Release the roll of skin. The point of the needle should remain under the skin.
- Grasp the IV set lock in one hand. Begin the flow of fluids by rolling the roller upward.
- If there is not a steady flow of fluid as seen in the drip bulb reposition the needle.
Amount of Fluid to Give
The instructions at the end of this handout will tell you how much to give for your specific situation. As a general rule, the average sized cat should receive 100-150 ml of fluids at one time. If you are using two spots, you should give half of that amount in each location.
Completing the Process
When you have given the recommended amount, complete the following steps:
- Stop the flow of fluids by rolling the roller in the IV set lock downward firmly. If you do not close it well and the bag is left hanging, fluid will drip.
- -Remove the needle from the skin and replace its protective cap.
- -PLACE A NEW, STERILE NEEDLE ON THE DRIP SET AS SOON AS YOU ARE THROUGH. This keeps bacteria that were picked up on the old needle from migrating into the fluids. Check local regulations in your community for proper needle disposal. Whatcom County resource link
- Store the equipment in a safe place until the next fluid administration.
General Considerations
It is not necessary to “sterilize” the skin with alcohol before inserting the needle. In reality, wiping a little alcohol on the skin does not really sterilize it, and the odor and feel of alcohol may aggravate your cat. Many cats will taste the alcohol and begin to drool profusely.
Most cats tolerate this procedure quite well. However, if the fluids are unusually cold or hot, they may be uncomfortable. Ideally, they should be stored at about body temperature. However, if they are at room temperature most cats are fine. Do not refrigerate them.
As the fluids are running, a lump will form under the skin. Do not be alarmed; this is a pocket of fluid that will be absorbed over several hours. If absorption is slow, gravity may cause the fluids to migrate downward. They could move under the skin of the front or rear legs; however, if this happens, they will still be absorbed. It is common to have a small amount of leakage from the site after needle withdrawal. Pinching the skin over the needle as it is removed from the skin helps to minimize this. In addition, do not be alarmed if there is a little blood noted after administration.
There is no problem if a few bubbles of air are injected under the skin. If quite a bit of air gets under the skin, you may feel a crackling sound when you push on the skin, and your cat may experience mild discomfort for a couple of hours, but no real harm will occur. The body will eventually absorb the air.
Troubleshooting
What to do if the Fluids Stop Running?
This often happens when the end of the needle moves against the skin or the underlying tissue. Do not remove the needle; rather, gently reposition it until the fluids begin to flow again. Experiment with the position of the needle until the fluids flow freely.
What to do if the Fluid Runs Slowly on Subsequent Treatments?
When you are finished giving fluids, you should close the lock firmly. However, closing the lock firmly may crush the tubing so that fluid will not flow well on subsequent use. If this happens, move the lock to another place on the IV tubing, and open the crushed area of the tube by pinching it with your fingers.
What to do if the Fluids Become Cloudy in Appearance or Have Floating Particles?
If any cloudiness, discoloration or floating particles occur, do not use the bag. It usually means that the fluids have become contaminated with bacteria. If you administer these fluids to your cat, a serious infection may occur under the skin.
Instructions for Your Cat:
- Give ___________ ml of fluids at each treatment.
- Treat your cat every ________ days or _________ times per week.
- Return _______________________ for further tests to monitor treatment progress.


